Monday, December 28, 2015

A Few of My Favorite Things- December 2015


Since I'm on Winter Break from school, I've had some free time, and what better way to use free time than writing a blog post?! I've rounded up some of my absolute favorites from the last month and I cannot wait to share them with you! These products are all amazing, so let's get started!


"Jingle all the Way" Lotion from Bath and Body Works
 
We'll start out with the only non-makeup related item that I have. This scent has been my go-to all month long. If there is one thing I hate, it's scents that are too sweet. I want to smell fresh, not like I just came out of the oven!! This is a great balance of wintery and festive, but also fresh and invigorating.  
 
 
Nivea for Men Post-Shave Balm
 
Some of you may think this is odd, but if you've been watching any YouTube videos lately, you'll know that this stuff is the latest and greatest makeup primer! Obviously it is not marketed as a primer, but let me tell you, the hype is real. I use this everyday! I have acne prone skin, so normally I run far away from primers. This does the job without breaking me out, it's under $5, and you get a lot of product for your money.
 
 
Profusion 5 Pan Eyeshadow Palettes
 
 
Every year around this time, Profusion comes out with special makeup sets. Most of these sets are useless, but if you see any of the 5 pan palettes- pick them up!! These 5 pan palettes have an amazing texture, and they are surprisingly pigmented. I have 4 different palettes, which I have picked up at Walgreens. The best thing? They are only one dollar!


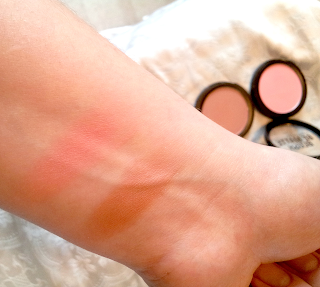
City Color Be Matte Blushes
("Fresh Melon"; "Papaya")
 
I picked up these City Color blushes at 5 Below this month, and I haven't been able to put them down!! These blend so well, they are never patchy, and they go on flawlessly every time. Not to mention they were only 3 dollars! There is an abundance of shades to choose from, so there's a color for everyone.
 
Maybelline Lash Sensational Mascara
 
It took me a while to get on this bandwagon, but I really love this mascara. As far as lashes go, I have no complaints with mine, so I'm not very picky with mascara. All I ever want from a mascara is length and volume- and what girl doesn't? I love this mascara because it gives me both length and volume quickly. I don't have to spend time building this up to get more volume, or combing out clumps in my lashes, it gets the job done right and it gets it done fast.
 
 
Becca Bronzer
"Flamenco"
 
This bronzer has been my go-to for December. This is the perfect bronzer for me, especially in the Winter when I am more fair. It is a great neutral shade-not too warm, not too cool. It blends beautifully and is pigmented, but not too pigmented. I feel like this is a fool-proof product, and whenever I use it, my bronzer always looks flawless. The formula is to die for, and the shade is absolutely perfect for me, I won't be putting this down soon!
 
 
Colourpop Highlighter "Smoke n' Whistles"
 
Last but not least, this highlighter from Colourpop has been my ride or die! I'm not exaggerating here- I have worn this highlight every day for the past three weeks. It is so beautiful! I apply this with the E.L.F flawless concealer brush, because it is fluffy and precise, and it leaves me with a perfectly blended highlight. This gives high end results for only $8- you can't beat that!


Thanks for joining me for my monthly favorites. I hope to be able to have more time to create posts in the future, but with school and work, my blog has taken the back seat. I hope you guys had a great holiday season, and that the new year treats you well!
 
 
Until next time!
 
-Hayley 


Tuesday, October 6, 2015

Fall Walmart Beauty Box Unboxing


Well, well well, it's been a long time since I've written a blog post! I've been very busy with college and work, so the blog has found it's place on the back burner. What a better post to get kicked off with after a break than a beauty sample unboxing! Let's get started.

To sign up for this box, click here.

Walmart has had beauty sample boxes for a while, unfortunately though, I've never been too interested in them. Until now, that is! These don't come out as frequently as other boxes do, they are only sold quarterly. So every season you can get a new box of samples, for just $5. Although these aren't monthly, there is one huge plus to them- you can subscribe! That's right, no waiting anxiously for them to release, or hoping you don't miss out on one. You can subscribe and forget about it! Unlike the Target beauty boxes, these contents will vary slightly. Like I said, these are $5 a box, so let's see what you get for the money!


This, my friends, is the main reason I was interested in this box. You can never go wrong with a razor! This seems to be in every box, so if you get the box, you'll get one! This works really well, and bonus- there's a coupon inside the box! So if you really like it, you can save some money when you decide to purchase one.

These lotions are so moisturizing, but they sink into the skin extremely fast! And of course, if you fall in love with them, you can purchase a full size and use the coupon they give you.

Obviously this isn't a super exciting addition to the box, but it's always nice to have mouthwash, and it's a great size to stick in your purse.

I always love a good travel size hairspray for traveling, and throwing in my bag. This one works well, and smells great too!

I haven't gotten to try these yet, but they seem promising, and behind the samples is a $2 off coupon.

I don't ever travel with self tanners, but this is a great size to try out the product. I can't wait to see if this works!


I'm never too ecstatic about foil packet samples, but hey, the lotion was good! No complaints here.

This came with a coupon too, and I might be using it soon! This deodorant smells amazing, and works great.


Unfortunately I have already received this lipstick in the same shade in a Target beauty box, so this will be going onto a friend. I do love this formula though, and wear it frequently! If only it was in a different shade.


I'm actually wearing this mask as I'm writing this! So far, so good. It smells amazing, and the heat feels very soothing on the skin. 


Well I think it's safe to say I'm loving the Walmart Beauty boxes! What a great value for the money! Not only do you get a ton of products to try, but you also get a lot of coupons. I can't wait to see what the future holds for this subscription service.

If you have received this box already, let me know how you feel about it! Also, don't forget to click on the link at the beginning of the post to sign up for a subscription. Don't miss out on this good deal!

-Hayley


Tuesday, September 1, 2015

Natural Brows: 3 Ways Under $3


Brows are the one thing that took me FOREVER to get right! I feel like I finally have got it down, but this has been literally years in the making. My brows are pretty bushy when I let them grow out, and they grow fast. When I was younger, I was afraid to do them myself because I thought I would mess them up, so I would get them waxed. This was a huge mistake. because I always went to different people- and none of them knew what brow shape I needed to suit my face. Because of this, I always rocked whatever they gave me, which was usually the thin, skinny brow. Luckily, my brows grow back super fast, so I am not stuck with the skinny brow! Today, I would say my brows are in the middle of the spectrum- not too thin, not too bold, and they suit my face.


Today I'm going to share with you how I fill in my brows to achieve a natural look!


For reference, this is how my brow looks without any product. A little unruly, but that's okay!


1) Eyeshadow


This is what I go for when I want a really natural brow look. It fills in the sparse areas nicely, and doesn't add a ton of definition. 

To achieve this look, I use the following products:


This is a physicians formula eyeshadow trio I scored at the dollar tree about a year ago. (I've been searching for them ever since, and have had no luck) You can see that the brown eyeshadow is very cool toned, which is ideal for my brow shade. If I do anything too warm, it makes them too red, and it's really not attractive.  


To apply eyeshadow in the brows, I use an angled liner brush! It's a good size, so it doesn't take me too long to fill them in, and it provides a lot of control.


Finally, I just brush them in place with a brow/lash comb. I don't use a setting gel when I'm working with powders, because usually I'm going for a fast and easy makeup look, so I don't find it necessary.


2. Brow Pencil 


This is the method I use about 75% of the time. It's natural looking, but adds definition to the brows, and doesn't take much time at all! This is ideal for everyday.

To achieve this look, I use these products:


This Jordana brow pencil retails for $2.99, and it's absolutely perfect! The shade matches me perfectly, and it comes with a brow comb so you don't need to buy one separately. This pencil comes in 3 different shades, and is sold at Walgreens. 


To set it in place, I use this E.L.F. Wet gloss for lashes and brows (I use both sides for my brows though). These retail for $2, but they've been popping up in Dollar Tree stores lately. This sets my brows in place all day, it works very nicely! I will be repurchasing this. 


3. Gel Eyeliner


I have a secret for you guys...


You don't have to buy Anastasia Dip Brow

As a matter of fact, you don't have to buy any pomade marketed for the brows. I know, it's shocking. For about a year, I've been using brown gel liners in place of brow pomade, it works just as well, and it's so much cheaper. I have to be careful with them, since I have light brown hair, and most gel liners are dark brown. If you have dark brown, or black hair, you should have no problem using this method, as most liners should be close to your brow shade. However, if you have very light hair, you should probably stick to good old dip brow, sorry ladies, but brown gel liner would just be too harsh for your hair color! 

To achieve this look, I use these products:


This Wet n Wild eyeliner in "Cocoa Riche" is perfect, and I got it on sale for $2.99 at Walgreens. Sorry it's a little messy, it gets a lot of love! Like I said, I'm very careful with this stuff, I make sure to really wipe the excess off my brush before I go into the brows with it. 


To apply the liner, I use a tiny detail brush- seriously this thing is TINY! I used to use an angled liner brush, but this gives me more control, so I don't go overboard. This helps me make sure my brows remain natural looking, and not drawn on.


and of course, I always lock my brows in place with the E.L.F brow mascara when I'm using liners.


Well that wraps up my post, I hope you guys learned something new about brows, or maybe you learned about a brow product you want to try out! I hope you all have a wonderful, productive week!! 


-Hayley 


Friday, August 28, 2015

Too Faced Chocolate Bar Palette: 4 looks 1 palette & Review


 I decided to challenge myself, and only use my Chocolate bar palette for the entire week. I wanted to write a review on this, but a review is just not enough! I have to show you guys how this palette performs, and how many looks you can create with it. This week, I was able to come up with 4 different looks. They are all very neutral and wearable.


The palette doesn't include the names written on the packaging (and I lost the plastic sheet with the names on it, OF COURSE). To help my explanations of each look make more sense, I made this so you can see which shadow is which.


Monday:


To be honest, Mondays are horrible. This particular Monday was a little rushed, and I didn't have much time to do my makeup. Consequently, this eye makeup took me like .2 seconds. I basically took a blending brush, and threw salted caramel and amaretto in the crease. Then, I deepened things up a little with milk chocolate and haute chocolate. Finally, I patted creme brulee on the lid with a flat shader brush, and highlighted my brow bone with white chocolate. Obviously this is nothing revolutionary, but it's one of my go-to looks, it's effortless and pretty, and takes no time at all. 


Tuesday:


Tuesday I had a little more time to do my makeup, thankfully! This is the most colorful look I've ever done with my chocolate bar palette, since it's really a neutral collection of shadows. Although I feel like this look would qualify as "colorful", it definitely leans more neutral and wearable. 

To start out, I threw salted caramel in the crease (obviously it's the perfect transition!). Then I placed candied violet in the outer corner, and blended, I repeated this until it was built up to my liking. I built it up this way so that I wouldn't have any eye shadow fall down on my face, that's never any fun. After that, I went in with a flat shader brush and placed marzipan on the inner third of the lid. I did quite a long wing, and then deepened up the outer corner with candied violet and triple fudge. I finished eveything off my highlighting my brow bone with champagne truffle. 


Wednesday:


 This look was incredibly easy to achieve, I almost feel bad featuring it, but it's just so pretty!

First, I blended salted caramel throughout my crease, then I simply placed marzipan on my entire lid, and champagne truffle on top of it. I love the look of these shadows mixed together, it's gorgeous! To finish off the look, I just highlighted the inner corner and browbone with champagne truffle.


Thursday:


 This is a very dramatic look, although the camera kind of washes it out. First, I took 3 different shades in the crease- salted caramel, milk chocolate, and semi sweet. Then I really deepened up the outer corner with black forest truffle. This falls out a lot because it is very glittery and pigmented, so if you need to do your eye shadow before your face makeup, go for it! I really took my time blending this out, just so it was seamless. The three crease shades I used made it a lot easier to blend out that harsh dark color. For the lid, I first put down creme brulee, then blended marzipan over top, to make a beautiful rose gold shade. I finished off the look with liquid liner, and a sweep of champagne truffle on the brow bone and inner corner.


Now let's get on to the review.

This palette retails for $49 and you can buy it here.

I received this palette as a gift almost a year ago, and it was my very first high end eyeshadow palette. This palette is amazing for anyone, but especially for the girl who doesn't already have any palettes. I feel like this is perfect for beginners, or for those who have been doing makeup for a while, because every eyeshadow you could need is in this palette! Many palettes I own are missing something- that perfect transition, a matte white, a perfect non-glittery highlight- and this covers all the bases. Even if I don't have any intention at all of using this palette in a look I'm doing, I usually end up pulling it out, because it just has all the basics that others lack. 

One thing I would like to point out is that this palette is almost overwhelmingly neutral. Even the "pops of color" in this palette are somewhat muted and lean toward neutral. This isn't a bad thing at all, because like I said before, this has all the basics you need, and the basics are going to be neutral shades. If you tend to not wear brown eye looks, this is obviously not the product for you, since half the shades in this are brown. Although many of these are in the same color family, they are pigmented enough so that you are able to see a difference when they're on the eyes. If these weren't as pigmented, they might blend into a muddy mess, thankfully this is not the case! 

In my opinion, if you're going to splurge on an expensive eyeshadow palette, it should be this one! There is a nice balance of matte and shimmer, and all the colors that this contains are very wearable and non-intimidating. You can take this palette from everyday natural looks, to dramatic evening looks easily. 

Even though the packaging is a little "novelty" with the chocolate bar theme, it still feels luxurious, which I appreciate. There is quite a large mirror, which I use all the time. I'm not going to lie, it's mostly because while you use the mirror, you can smell the light, sweet chocolate-y smell. Oh yeah, I forgot to mention, it smells like chocolate!!

Overall, if you're a girl who loves to rock neutral eye looks, I think this palette is for you! It's pricey, but if you think you'll get good use out of it, it's worth it. 


Until next time, I hope you all have a wonderful weekend!!

-Hayley 


Monday, August 24, 2015

Estee Lauder Double Wear Foundation Review & Bonus Hack!


While I really love my affordable drugstore products, I also love to try higher end cosmetics. When I started this blog, I knew I wanted to focus heavily on affordable makeup, so I wasn't sure if I wanted to do any posts on expensive products. However, I know that before I buy a high end beauty product, I do as much research as I can before I buy it, it's so important to know what you're buying, especially when it's so expensive! This is why I am going to do a few reviews here and there on my more expensive makeup, because the more information you have before making a big purchase, the better!


Estee Lauder Double Wear Foundation

Price: $38 

Claims: Flawless, weightless full coverage for 15 hours. Natural looking, and buildable. Won't oxidize, or irritate sensitive skin. 

Let me begin by telling you that I have owned this product since May, and yes, I still do own the box, and it is in pristine condition. I know this is mildly concerning. That said, since I have owned this foundation for so long, I have had a ton of time to put this to the test, and I am confident in how I feel about this stuff! Before I give you my full review, I'm just going to show a couple pictures, to let this product speak for itself. 


This is my freshly washed face, at 9:00 a.m. Obviously I have acne, and a ton of scars from previous blemishes. On top of that, my face is very pale, so anywhere I get a blemish, my skin becomes extremely red, making it look worse than it is. The sunlight on my face is making my redness look less severe, so take that into consideration. This is just the canvas we're working with, to give you an idea. 


Here, half my face is completely bare. The other half has one layer of ELDW, which was applied with a damp beauty sponge, and Urban Decay naked skin concealer. I want you to know that I literally placed a piece of tape down my face to get an even line, and it looked ridiculous. It felt very weird looking at myself like this! You can see the side with foundation looks overall more even, and my face actually matches my neck.


Here is another photo of the one layer of foundation, with nothing else. As you can see, it doesn't cover every blemish and scar, but I don't find that necessary. If I really wanted to, I could go in with concealer, but I don't want to risk my face becoming cakey- no one can pull off that look, especially me! Here you can see that while I get great coverage out of this foundation, it still doesn't look thick and unnatural looking. There is still life and radiance to the skin. 


This photo was taken after my makeup was freshly applied, around 10 or 11 a.m. In person, you can still see some scars and blemishes, but like I said, I don't see a problem with that. 


This photo was taken after 7 hours. I went to work, and did a little shopping, so nothing strenuous, but honestly, after 7 hours it looks just about the same as it did freshly applied! I do use powder on top of this, and set with a setting spray, but I didn't use a primer, I rarely do. 


Here are swatches of the two shades I have in samples, they are both in the warm category. 1W1 is the shade I own in the full size, but I can sometimes make 1W2 work, if I mix it with a very pale foundation, or if I'm more tan than usual. 


Now on to the review! Let's begin with the dreaded pros and cons list, shall we??

Pros:

* Full coverage
* Isn't thick or heavy
* Withstands anything! Heat, rain, war, you name it, it will last through it. 
* Blends easily, and doesn't set too quickly, so you can work with it. 
*Luxurious packaging. Honestly ladies, you get what you pay for, and you just can't get packaging like this at the drugstore. 
* Wide shade range!! If you have a hard time finding your foundation shade, you can find it in this product.
*Doesn't break me out.
 

Cons:

*No pump *sigh* 
* Expensive
* Glass packaging makes me nervous, because I'm a klutz. 

This foundation is literal perfection if you ask me. I love that I can almost completely cover my blemishes and scars, and still feel fresh faced, and not like I have makeup caked on. I love to mix this with my favorite drugstore foundations, so I can get more coverage, and a better color match for my skin. This foundation is so buildable! It seriously never looks too heavy. Because of this reason, I sometimes get carried away and use a little too much, but that leads me to tell you my Double Wear hack!! *drum roll*


For just 2 dollars, you can stroll over to the Clinique counter and buy yourself a pump for your ELDW foundation! How amazing is that?!


This is a closer look of what the box looks like, so you can see what to ask for. Like I said, it only costs $2, compared to a MAC pump that is $10. This helps me have consistency when applying, so I only use two pumps for my entire face, or one pump when I'm mixing it with another foundation. It's also useful for making sure I don't use too much product, since it's so expensive, I don't want it to run out quickly! This is a more hygienic option for those of you who apply foundation from the bottle with your fingers, but as for me, I always pour it on my hand, so the pump mainly just helps me save product. 


Well this concludes my review! I hope this was helpful for those of you interested in buying Double Wear, or for those of you looking for an affordable pump to put on your foundation bottle! I hope you all have a wonderful week, and if you have an questions or requests, leave them in the comments below! 


-Hayley